
MATERIALS: Electricity BibsTM

OUTLINE OF THE CLASS:
Introduction and Safety:
Introduce electricity by asking questions about the student's experience with electricity:
Introduce electric circuits by asking about words that sound like
parts of the word circuit.
The kids will usually respond with words like circus or circle. Describe how each of their choices is related to the concept of a closed circle (as in the "ring" of a circus). Then focus on the word circle by saying that an electric circuit is really like an electric circle. Then state that most of this class will focus on making electric circuits or electric circles using real electric parts. This leads in to the introduction of the Electricity BibsTM themselves.
Introduce the Electricity BibsTM and a few safety issues:
Hold up a few bibs to show the variety of components the students will be using. Then put on one of the bibs and demonstrate how to operate the alligator clips. Be sure to point out that the students should be careful not to rip the wires when connected to other students. They should also be advised to keep the bibs properly clipped when walking around to keep from stepping on the dangling wires. Emphasize that these are real electrical components and that they will really work when connected together! Tell the students that they will be using these for most of the class, but first they're going to do a little skit about electricity.
Electricity Skit:
Atoms
Introduce the notion that everything they can touch is made up of atoms. Then draw a "typical" atom on the board and describe it's main parts (protons, neutrons, and electrons). Be sure to point out that the protons are considered positive (+), the electrons are considered negative (-) and the neutrons are considered neutral (0).
Build a Battery
Now it's time to build a battery of atoms. The battery will have 3 "atoms" on the positive side and 3 "atoms" on the negative side. Each "atom" will contain 2 students (proton and electron) for a total of 12 students (3*2 + 3*2). Pick 12 students (6 protons and 6 electrons), give them their bibs, and arrange them into 6 "+" and "-" pairs (these, of course, are hydrogen atoms, but copper uses way too many students!). Have the proton/electron pairs hook their arms together because the opposite charges attract (good time to remind them of magnetism). Then separate the atoms into two groups in the front of the classroom to create the battery. There should be 3 atoms (3 protons and 3 electrons) on each side. Then draw the outline of an "AA" battery on the board behind the students and count up the protons and electrons at each end of the battery. The totals for each side should be 0 (+3 -3 = 0). This is because the battery isn't charged yet. Write these numbers on the board at each end of the battery.
Move those Electrons
Then ask if anyone knows what's inside of a battery. Usually someone will say chemicals or acid. Point out that those chemicals contain chemical energy. That's when you (the instructor) puts on the Chemical Energy bib to simulate chemical energy in the battery. Explain that the chemical energy pulls electrons from the positive side of the battery and puts them on the negative side. That's when you begin to drag one of the electrons from the positive side. Remind the atoms that the protons and electrons want to stay together so they should put up a bit of a struggle (but also remind them that they're only acting!).
Count the Charges
After depositing the electron on the negative side of the battery it's time to recount the protons and electrons. Always count the protons first because elementary students are more comfortable subtracting from positive numbers. The positive side will have plus 3 minus 2 which is plus 1 (+3 -2 = +1). The negative side will have plus 3 minus 4 which is minus 1 (+3 -4 = -1). If they're not too familiar with negative numbers you can just remind them that there's one extra negative which is written as -1.
Go Get Some More Electrons
Then Chemical Energy goes to get another electron. Again drag the electron from it's proton "buddy" and deposit it on the negative end of the battery. And again update the tally (+3 -1 = +2 and +3 -5 = -2). The battery is getting charged up! Now grab the last electron and repeat the process. Update the tally to show (+3 -0 = +3 and +3 -6 = -3).
Charged and Ready
Now the battery is charged and ready to go. All of those extra electrons would "like" to get back to their proton "buddies", but Chemical Energy keeps them apart. Now ask what would happen if the electrons could take another path around Chemical Energy. Would they take it? Sure! And that's what a wire is. It's just an easy path for electrons to move through. But rather than just make a direct path with a wire, we're going to put a few electrical parts in the way.
Light, Sound, Action!
That's when you ask for three more volunteers to act as a light bulb, electric motor, and a buzzer. Position the three students around the perimeter of the room so the electrons can run past them. Instruct each of these students to hold out their hands to get slapped by the electrons as they run around the room. Further instruct the light bulb to extend its arms and say "Ta Da!" (giving off light) when an electron slaps its hand. Instruct the motor to spin around and make a motor sound when an electron slaps its hand. Finally instruct the buzzer to make a noisy buzzing sound when an electron slaps its hand. Be sure to demonstrate each of these for the kids - it helps get them over any shyness they might have (it's also highly therapeutic for grown-ups to act silly once in a while).
Let it Flow
Then go back to the center of the battery as Chemical Energy. Select one of the electrons (from the negative side) to run around the circuit and join back up with its proton buddy. Narrate the electron's progress as it lights the light, spins the motor, and buzzes the buzzer. When the electron returns, you should select another electron to follow it. Then remind the class that Chemical Energy is still strong and continue dragging electrons from the positive side to the negative side. As you drag them across, you can select additional electrons to run around the circuit. Continue this process of dragging electrons across the battery and letting them run around the circuit until all of the electrons have had a chance to make the trip. You can continue even longer depending on your own energy and the excitement level in the class.
Winding Down
At some point all this action starts getting the class stirred up and you have to slow it back down again. The best way to do this is to start "huffing and puffing" as a visible sign that Chemical Energy is getting tired. Keep track of the electrons and stop dragging them and stop sending them around the circle when there are 3 electrons on each side. That's when you can just stand there breathing heavily and acting very tired. You might comment that dragging all those tough little electrons is a lot of work and that you've worn yourself out!
Bye Bye Battery
Then ask what happens to a battery when all of the chemical energy is worn out. The typical answer is that the battery is "dead". You can reinforce this concept by re-tallying the protons and electrons on each side. Both totals should be zero. So is there any reason for the electrons to run around the circle? They're already hooked up with their proton buddies so there's no need for them to move anywhere! And without electrons running by, the light bulb won't light, the motor won't spin, and the buzzer won't buzz!!
That's the end of the skit, so ask for a round of applause for the actors and have the kids turn in their bibs and return to their seats. At this point, you can elaborate on the skit to point out some of the flaws in the model (depending on the sophistication of the class). Here are a few suggestions:
v = i * R
Where v is the voltage, i is the current, and R is the resistance.
Demonstration of Electricity BibsTM:
Now it's time to get started with the actual circuits. It's good to start with a simple circuit demonstration, and follow that up with a description of the "Flow Control" process.
Circuit Basics
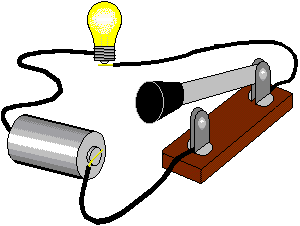
Ask for two volunteers to demonstrate a simple circuit. This circuit will be a simple battery / light bulb circuit (similar to this picture without the switch).
Give each of the students their respective bibs and then hold up the yellow circuit card (circuit number one) for the class to see. Then draw the circuit on the board. Point out the symbols for the battery and light bulb. Also show the list of symbols on the back side of the card. Then set the circuit card on the floor and position the two volunteers at their respective locations around the card. Point out that their bibs have symbols which match the symbols on the circuit card. Finally have the volunteers connect their alligator clips (explaining the name is fun) as shown on the diagram (the "X" symbols are the connections). The wires are color coded red and black to match the diagram. Note that these circuits typically connect red to black to indicate the direction of current flow. This is NOT the typical use of these colors and this is worth mentioning to the class.
After they have connected their wires, the light bulb should light. Have the volunteers turn so that everyone can see. Then go through the questions at the bottom of the circuit card. This involves individually disconnecting each of the two connections and observing the result. Be sure to go through all of the questions. Then have the volunteers disconnect their wires, clip the wires to the bibs (cross-clipping to reduce dangling wires), and swap bibs and places. Then repeat the circuit to demonstrate that each student will get a chance to be each of the devices in their circuit. Finally, have the volunteers disconnect their wires, cross-clip them to the bibs, and prepare to turn them in.
Flow Control
The very last part of the demonstration involves showing how the remainder of the class will be conducted. The remainder of the class will be run as a series of independent group study activities. This is a self-paced process and can be difficult to manage with 30 kids. So it's a good idea to use the two volunteers to demonstrate the process so everyone understands how it will work. Walk the volunteers through the process (outlined below) so that everyone will know what to expect and what will be expected.
Asynchronous Group Study Circuits:
Most of the class time will be taken up with the last exercise where the kids actually build the various circuits themselves in small independent groups. This can be difficult to manage and has historically been one of the biggest problems with this class. After many trials (and many disasters) this process has finally evolved into the following system. It's the best method I've found for teaching Electric Circuits, and I often use it to teach a full class by myself for the San Diego City School's GATE program.The Bib Table
The "system" involves two sets of tables. One set of tables is up against a wall and it will hold all of the bibs that are waiting to be handed out. One of the instructors (and sometimes the ONLY instructor) will take bibs from this table and give them to the students. The instructor will also return the bibs to this table keeping them in neat piles.
The Service Counter
The second set of tables separates the instructor from the class. It is like a service counter where kids can come to "order" their circuits and parts. This "service counter" contains all of the circuit cards organized by circuit number. The students will line up in front of whichever circuit card they want to try. When a given line contains enough students, the instructor will give them a circuit card, assign a group leader, and hand out the bibs. Always remind the students to take turns with each of the bibs so everyone gets a chance to play every part. The students then move off into the remainder of the room to implement their circuit.
The Return/Interrogation Line
One end of the "Service Counter" is designated as the "Return Line". That's where the kids will line up to turn in their bibs after they've done their circuit. One of the instructors will manage this line by taking the circuit card and asking the questions. I typically ask each student in the group a different question to be sure that everyone is participating. Some questions, however, are easy enough that I ask the whole group at once. They can all call it out together. Depending on the responses, I will sometimes detect that they didn't connect the circuit properly or didn't try all of the questions with the real circuit. In those cases I will ask them to go back and try it again before getting another circuit. I might also check that everyone was able to have a turn with each component. If I am satisfied with their responses (usually the case), I'll take their bibs and their circuit card and put them back on the Bib Table and Service Counter where they can be given out to other students. When I run the class alone, I multiplex my time between asking questions at the Return Line, handing out bibs at the Service Counter, and helping groups in the remainder of the classroom.
Clean Up and Maintenance
At the end of the class the bibs should be grouped and neatly stored in their box. This makes it easier for the next team to set up their class without having to sort them. It is also recommended that the batteries be removed from the battery bibs and safely stored when not in use. This is to prevent any possibility of a short circuit between battery bibs. The batteries may need to be replaced from time to time (especially if the kids inadvertently short them in a miswired circuit). Standard "AA" batteries should work fine. The light bulbs may also burn out and are available at Radio Shack (Miniature #222 Lamps, 2.4 Volts, 360mA, E-5 Base, Cat. No. 272-1176).
Circuit Cards:
This section should contain all the circuit cards with questions and answers in the (near?) future.
Contact Information:
Please let me know of your experiences (good or bad) with this lesson.
I have tried to be thorough, and I apologize for its length.
You can reach Bob Kuczewski via email at: support@edugateway.com